Building your own bee frames can be a rewarding experience for any beekeeper, whether you’re just starting or looking to deepen your beekeeping skills. By learning how to build bee frames, you gain control over the quality and customization of your hive, ensuring a healthier environment for your bees. Additionally, wearing the right beekeeping suits and beekeeping gloves during the process not only protects you from stings but also allows you to work with confidence and precision. In this guide, we’ll explore the essential tools, techniques, and tips to get you started.
Understanding the Basics of Bee Frames
Before diving into the process of building bee frames, it’s essential to understand what a bee frame is and why it’s crucial for your hive.
What is a Bee Frame?
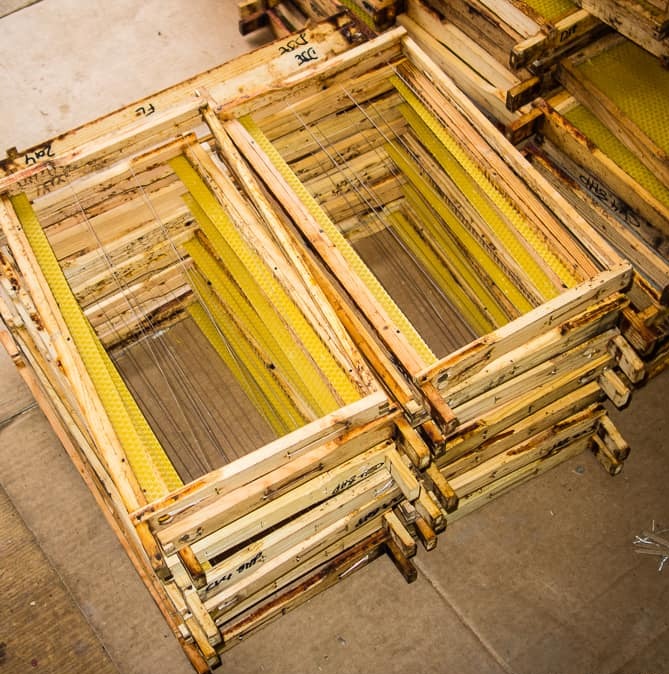
A bee frame is a structural element that holds the wax foundation where bees build their comb. These frames fit into the hive boxes and can be removed for inspection, honey extraction, or replacement. The frames are the backbone of the beekeeping process, as they support the development of the colony.
Types of Bee Frames
There are different types of bee frames, but the most common are Langstroth frames and Top-Bar frames. Each has its own advantages:
- Langstroth Frames: These are the standard frames used in most hives, known for their ease of use and efficiency in honey production.
- Top-Bar Frames: Often used in more natural beekeeping practices, these frames allow bees to build their comb freely.
Understanding the type of frame that best suits your beekeeping style is crucial before you start building.
Essential Tools for Building Bee Frames
To successfully build bee frames, you’ll need the right tools. Let’s look at the essential equipment you’ll need as a beginner.
Basic Tool List for Beginners
Here’s a list of basic tools you’ll need to get started:
- Hammer: Essential for assembling the frame.
- Saw: Used for cutting the wood to the correct size.
- Measuring Tape: Ensures accuracy in your cuts and assembly.
- Wood Glue: Provides extra strength to the joints.
- Nails or Staples: Hold the frame pieces together.
Having these tools on hand will make the process smoother and more enjoyable.
Safety Equipment
Don’t forget about safety! When you’re working with wood and tools, it’s important to protect yourself. Consider using:
- Gloves: To protect your hands from splinters and sharp edges.
- Goggles: To shield your eyes from wood chips and dust.
Safety is always a priority, especially when you’re a beginner.
Step-by-Step Guide to Building Bee Frames
Now that you have your tools ready, let’s walk through the steps to build bee frames.
Step 1: Gathering and Preparing Materials
Start by gathering all the materials you’ll need, including wood, nails, and foundation. Ensure the wood is of good quality and free from knots or defects.
Step 2: Cutting the Wood to Size
Using your saw and measuring tape, cut the wood into the necessary pieces: sidebars, top bar, and bottom bar. Precision is key here, as the pieces need to fit together perfectly.
Step 3: Assembling the Frame Structure
Begin by attaching the sidebars to the top bar using wood glue and nails. Then, attach the bottom bar, ensuring everything is aligned correctly. This forms the basic structure of your bee frame.
Step 4: Attaching the Foundation
Once the frame is assembled, it’s time to attach the foundation. This is where the bees will build their comb. Make sure the foundation is securely in place, as this will support the entire structure.
Step 5: Finishing Touches and Quality Check
Finally, inspect the frame for any loose nails or misaligned parts. Sand down any rough edges and ensure the frame is sturdy. This final check will ensure your frame is ready for use in the hive.
Tips and Tricks for Beginners
Building your first bee frame can be challenging, but these tips will help you avoid common pitfalls.
Common Mistakes to Avoid
- Overdriving Nails: This can weaken the wood.
- Using Warped Wood: Always use straight, solid pieces of wood to ensure stability.
How to Ensure Frame Stability and Durability
Use high-quality wood and double-check your measurements. Applying wood glue along with nails can provide extra strength.
Customizing Frames to Suit Your Hive
As you gain more experience, you can start to customize your frames. For example, you might add extra supports for heavy honey loads or adjust the size to fit different hive types.
Maintenance and Care of Bee Frames
Once you’ve built your frames, proper maintenance is crucial to their longevity.
Inspecting Frames for Wear and Tear
Regularly check your frames for any signs of damage, such as cracks or loose joints. Addressing these issues early will save you time and effort in the long run.
Repairing Damaged Frames
If you notice any damage, repair it immediately. Small issues can often be fixed with wood glue or by replacing a single piece, rather than the entire frame.
Proper Storage of Spare Frames
Store spare frames in a cool, dry place to prevent warping or mold. Proper storage ensures they’re ready to go when you need them.
Conclusion
Building your own bee frames is a rewarding process that not only saves you money but also allows you to customize your hive to suit your needs. With the right tools, beekeeping accessories, and techniques, even beginners can create sturdy, reliable frames that will serve their hives well for years to come. So, gather your tools, follow these steps, and start building your bee frames today.